Food Microbiology: How to choose the best gravimetric diluter for your lab ?
The gravimetric dilutor, has become an indispensable tool in food microbiology laboratories in just a few years.
We are not afraid to say that it is THE central piece of equipment in the food QC lab (standardization, traceability, productivity, etc.). Needless to say, when switching to a new model, you can’t afford to make a mistake… otherwise, it can become a real nightmare!
In this article, we’ve listed the main criteria to consider when purchasing a new gravimetric diluter. It will help you define your needs and save time when meeting with suppliers.
Happy reading and happy shopping!
Content :
- What is a gravimetric diluter used for?
- Technical features
- Usage features
- Metrology
- Installation & Service
Best Dilutors
Discover the Top 2
Gravimetric Diluters
We polled the SuperMicrobiologists.
Here are their favorite Dilutors
What is a gravimetric dilutor used for?
A gravimetric diluter is an instrument used in food microbiology labs to automate sample dilution. It helps increase productivity in food microbiology laboratories.
Example:
The lab needs to weigh 25g of ground meat and add 225ml of pre-enrichment broth. Since precision can be tricky, the lab might accidentally place 25.5g of meat in the bag (instead of 25g).
With a gravimetric diluter, there’s no need to remove the “extra” 0.5g. The diluter will add the necessary volume of culture medium to ensure precise 1/10th dilution.
At the end of the dilution, the scale will indicate 255g.
The gravimetric diluter is essentially a scale that communicates with a pump to perform quick and precise dilutions… at least, that was the original idea!
Today, the gravimetric diluter has many more functions, such as standardization and traceability. That’s why it has become the cornerstone of the food microbiology lab, without which nothing can be done.
Technical features of the gravimetric diluter
Here are the points to consider when purchasing a new diluter:
Scale range
A diluter cannot have a wide, precise range and be fast all at once, so it’s essential to inventory the weights you’ll be handling:
- 1g (e.g., pharmaceutical and cosmetic applications)
- 10g – 100g (e.g., wipe application)
- 25g – 250g (e.g., classic food applications)
- 375g – 3.75kg (e.g., food pooling applications)
Each application requires different accessories (rack, nozzle, tube).
Based on your applications, you may need two different diluter models.
Tip: Take inventory of the different weighings the lab needs to perform, then classify them by frequency of use.
Scale precision
What precision do you need? 1g, 0.1g, or 0.01g?
It’s important to ensure the diluter provides the expected precision (weight at the time of sample weighing, and after the addition of the culture medium).
Weight of the diluter
To avoid cross-contamination, microbiology labs clean their workbenches regularly. For this, you need to be able to lift and move the diluter. The weight of the gravimetric diluter can thus be a selection criterion (though the thrifty labs might joke that it saves them a gym membership!).
Caution, the heavier the dilutor, the more… stable it will be. Which is actually a good thing for a balance.
Tip: If you can get a loaner, have everyone who will need to move the dilutor practice before it’s installed for regular use.
Footprint of the dilutor
Some diluters take up more space than others, and space is often at a premium in food microbiology labs (if only chemists had smaller labs!).
Don’t forget to account for the space taken up by the pumps and accessories (barcode reader, printer, keyboard, etc.).
Tip: Determine the location of the dilutor in the lab and measure the available space.
Number of pumps
A gravimetric diluter can be used with multiple diluents (BPW, Fraser, etc.). Each diluent requires at least one peristaltic pump (or two for the turbo option). Inventory the diluents used.
Arm motorization
Today, nearly all gravimetric diluters have a motorized arm. Once the target sample weight is reached, the arm automatically dispenses the culture medium.
Each dilutor has a different arm movement (lateral, horizontal, or vertical).
Tip: Check that the movement is compatible with your workspace and does not create a contamination risk (such as the dispensing nozzle leaving the sterile zone, or the sampling nozzle being too close to the sample or the operator’s hands).
Liquid protection
Countless times, dilutions are launched without a bag or with a poorly positioned one… Result: diluent everywhere!
Not only does this dirty the gravimetric diluter, but it also poses a risk to its electronics (including the electronic boards located at the “balance hole,” rear ports, screen, and keyboard).
Tip: Check the protection measures put in place by the supplier to avoid “blowing a fuse” (and frying an electronic board)!
Program availability
We use the gravimetric dilutor for several “types” of dilutions, so it is important to check that all the programs you commonly use are available:
- Dilution program: This program is used for standard dilutions, such as 1/2, 1/4, 1/10, or others.
- Dosing (or dispensing) program: This program allows for dispensing a fixed volume of diluent, regardless of the weight of the bag. It is used for swab and/or sponge surface sampling analyses.
- Powder program: For powders, the liquid (diluent) should be added first, followed by the powder (to avoid spreading powder everywhere and to prevent osmotic shock). This program initially dispenses a volume of diluent. The microbiologist then adds the powdered sample, and the dilutor adds a final volume of diluent to adjust the dilution.
Tip: Make an inventory of all the programs used in the lab. Ideally, rank them by frequency of use.
Compatibility with different bags
In the microbiology lab, we often use several types of bags, including side-filtered or full-page filtered bags, non-filtered bags, and even small bags for sponges and wipes.
Is the rack compatible with all these bags? Do you need to change racks depending on the type of bag? If so, this could significantly reduce productivity.
It might then be wise to group samples by bag size or invest in two dilutors with different racks.
Tip: Make an inventory of the bags used in the lab and rank them by frequency of use.
Ease of programming
Generally, programs are only created once at the beginning, but for some dilutors, this step can be quite complex… especially if you don’t practice it often.
It would be a shame to have to call in the supplier every time you need to create a new program.
Tip: Take advantage of a trade show, a seminar, or a loaner to test program creation yourself.
The traceability of dilutions…
Traceability is something that can save (or waste) a lot of time with a gravimetric dilutor. It’s worth taking the time to properly define your needs.
If you don’t have a LIMS (if you do, see the next point) and you want to retrieve traceability data from your dilutor, it’s important to list the information you’ll need (weight, operator, serial number, sample ID, etc.).
Ask the supplier how this information can be retrieved (USB, PC connection, printout, etc.).
Tip: Ask the supplier to send you a sample extraction file. Check that it contains all the information you need.
… and connectivity to a LIMS
And here we delve into what the microbiologist doesn’t really master… IT!!!
All suppliers will tell you that their dilutors are compatible with a LIMS (one-way, two-way), but the reality is often much more complicated.
You can also ask your LIMS provider if they have already connected a gravimetric dilutor in another lab or if the dilutor supplier has connected one of their devices to your LIMS.
Tip: Clearly define your needs and propose a meeting with all three parties (the lab, the LIMS provider, and the gravimetric dilutor supplier).
Label printing
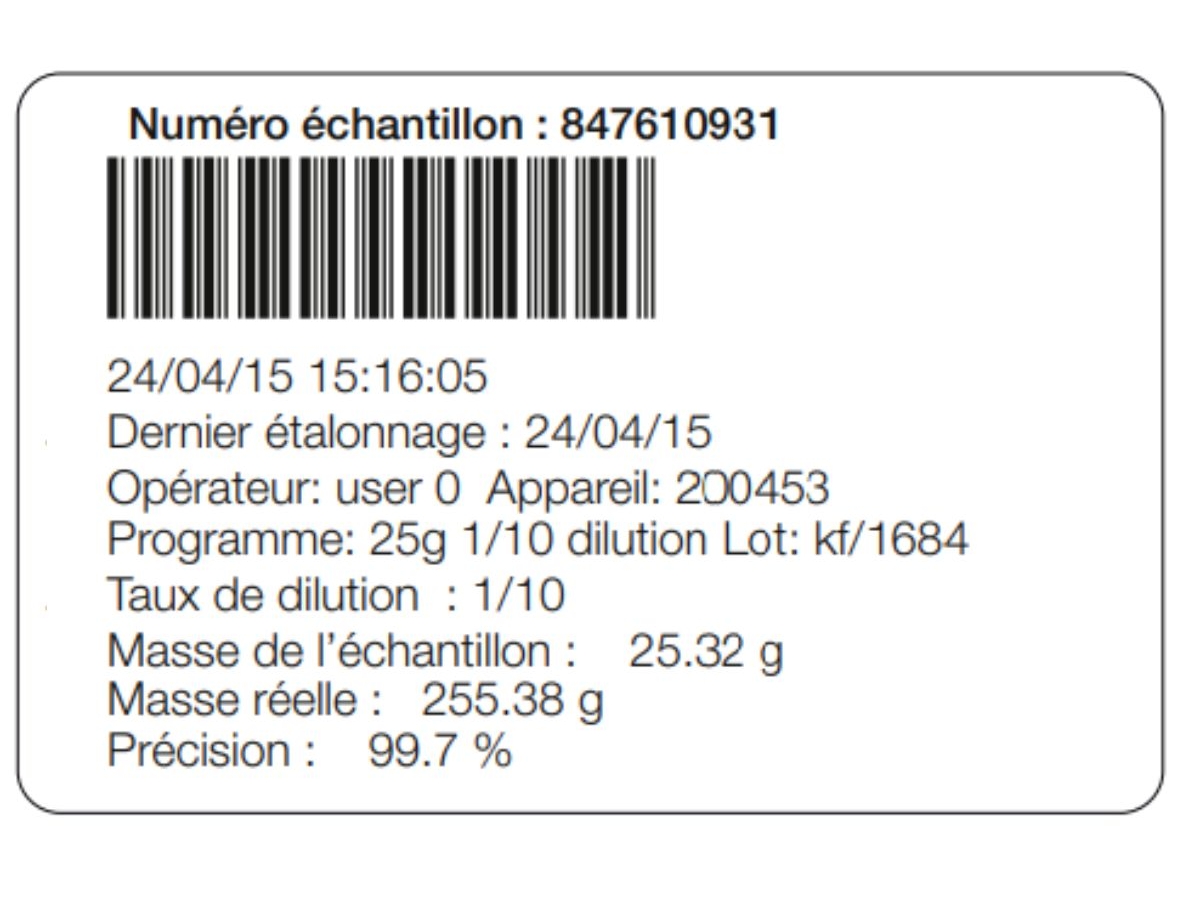
For traceability purposes, gravimetric dilutors can be connected to small thermal printers that print on adhesive labels. Some labs need to print labels in duplicate, so it’s important to check if this is possible (and ideally automatic).
Tip: Ask the supplier to print a sample label for you, so you can verify that all the necessary information is included.
Cross-contaminations
A dilutor should never be a source of cross-contamination. Depending on how you plan to use it, some brands may be more or less sensitive to cross-contaminations (biosafety cabinet, Bunsen burner, type of matrix, operators, etc.).

But what is that green finger, is it an elf?
Most of the time, cross-contaminations come from the dispensing tip. Ideally, it should be as far as possible from the operator’s hand and the sample… while still remaining in the “sterile” zone.
Tip: Ask to test the dilutor in your lab, with multiple operators and matrices.
Dilutor accessories
There are many accessories available for gravimetric dilutors: printer, barcode reader, keyboard, PC, foot pedal, etc.
What do you really need? This often depends on the level of traceability you require.
Be careful, the cost of accessories can significantly impact the overall price of the dilutor. Don’t forget to ask about them.
The cost of consumables
Consumables include items such as tubes, stainless steel parts (trocar, dispensing tip), and racks (be aware that plastic racks can be fragile).
Although they are sold as accessories, they are often consumables (especially the tubes!).
These consumables are a lucrative business for manufacturers, so be sure to factor them into the total cost of the dilutor.
Tip: Ask to include the prices for all these consumables in the dilutor’s quote.
Usage Features of the Gravimetric Diluter
Use under a hood or biosafety cabinet (BSC)
In the past, all diluters were placed on benches next to a Bunsen burner… but that was before gas was banned from labs (not due to cost, but safety concerns).
Nowadays, more and more diluters are found under BSCs or laminar flow hoods. If that’s your case, here are the points to check:
- Scale stability: The airflow may affect the scale’s readings.
- Diluter stability: The work surface of a BSC might be flexible, meaning pressing a button (e.g., the tare button) could impact the scale’s precision.
- Space constraints: In a BSC, the front glass can make handling more difficult. The diluter should be as low as possible (level with the bag opening) and not too deep (the bag should be easily accessible to the operator). Be mindful of potential repetitive strain injuries (RSI).
Tip: Request a demo device and test it under real conditions. Make sure all technicians use it to ensure it fits your lab’s needs.
Dilution Speed
A diluter is designed to save time in the lab (well, ideally!). Therefore, it’s important that the dilution process happens as quickly as possible.
To evaluate this, you need to consider both the scale stabilization time and the distribution time. When weighing the sample, some scales take longer to stabilize than others.
Tip: Test the diluter in your lab conditions and time the process. Be sure to test all the programs frequently used in your lab to get a realistic sense of its performance.
Dilution Precision
Most manufacturers offer multiple modes: one prioritizes precision but is slower (the dilution ends with a drip-feed for accuracy), while the other is faster but less precise (turbo mode).
In supplier brochures, you’ll often see the precision of one program showcased alongside the speed of another…
Tip: Determine your acceptable tolerance limits (e.g., 2%) and then test the diluter’s speed and precision with all the programs your lab uses, especially the most frequent ones.
Ease of Use
The diluter is a productivity-boosting tool in the lab, so it must be easy to operate:
- Effortless operation: Users often switch between different media, dilutions, and operators. Are program changes intuitive, quick, and easy to make? Since this is a productivity instrument, hidden time delays can reduce efficiency and increase the risk of errors.
- Ergonomic design: Can the sample bag be positioned quickly without lifting your hands above shoulder level (to avoid repetitive strain injuries)? Is the bag opening wide enough to easily insert the sample?
Tip: Ask for a loaner then try it again and again to make sure the gravimetric diluter fits the specific needs of your lab.
Taring
Taring is the process of resetting the scale to zero after placing an empty bag.
This can be done either automatically (the diluter detects the empty bag and automatically resets to zero, known as “autotare”) or by pressing the tare button.
Tip: Press the tare button and ensure the scale stays at 0g after resetting
The autotare legend: There’s a myth that autotare can introduce a bias. If you gradually add feathers to a dilution bag, you could potentially add up to 1 kilo of feathers while the diluter still reads 0g… something to test in your lab.
By the way, which is heavier, 1 kilo of feathers or 1 kilo of lead?
Automatic Dilution Start
This option triggers the dilution automatically once the target sample weight is reached.
- Positive side: There’s no need to press a button to start the dilution process.
- Negative side: There’s a 1 to 2-second delay to allow the operator to remove their hand. While this may seem brief, in a production flow, it can be very…long !
Another consideration: if the hand isn’t removed in time, the machine will still initiate the dilution 😉 .
Tip: It’s often a matter of getting used to the timing and rhythm. Ensure all lab staff are comfortable with both options.
Bag Opening Width
The width of the bag opening can vary depending on the type of holder used. A wider opening makes it easier to place the sample inside.
Tip: Get your rulers out—measure and test to ensure the bag opening is wide enough for efficient use!
Bag Attachment
It’s still common to see bags attached with Blu-tack, which doesn’t hold well and can become a breeding ground for microorganisms—not ideal for a microbiology lab.
In recent years, more innovative, easy-to-clean attachment solutions have appeared that offer better grip (…or not).
Tip: Make sure the attachment system works with all your bag types (sizes and filters).
Cleanability
When adhesive Blu-tack doesn’t hold well, you may end up with diluent spilled all over the diluter. Even with caution, this is bound to happen at some point
Therefore, it’s essential to ensure the gravimetric diluter is easy to clean. Ideally, avoid areas with crevices or hard-to-reach spots. Stainless steel is often easier to clean than plastic.
Tip: Inspect the diluter thoroughly from all angles to ensure it can be cleaned easily and efficiently.
Metrology of the Gravimetric Diluter
Daily Verification
Once or twice a day, technicians check the accuracy of the diluter’s scale—this is known as an accuracy test.
To perform this, a weight is placed on the scale, and the measured value is recorded. This helps determine whether there is any deviation in the scale. Typically, the results are logged on a sheet near the diluter, but ideally, this could be integrated into the diluter itself.
Tip: Does the diluter offer a built-in program for this, and can it ensure traceability of these checks?
Calibration
In case of deviation, the diluter’s scale must be able to be recalibrated. Access to the calibration program should be password-protected to avoid accidental calibration.
When in the program, the scale should be calibrated at least at two points: 0g (tare) and a specific weight (depending on the standard weight you use).
The calibration date is usually recorded within the device.
Tip: Make sure access to the calibration program is locked. Test the program to confirm its ease of use and accuracy.
The gravimetric dilutor metrology
Each laboratory has its own metrology protocol, making it difficult to integrate this step directly into the diluter.
Typically, results are recorded on a sheet or in an Excel file. However, it’s crucial to verify that your metrology protocol is feasible with the diluter:
- Can the rack hold weights in the exact locations where the metrologist needs to take measurements?
- Are the weights stable on the rack?
- Is the device’s resolution compatible with your metrology protocol (i.e., the number of decimal places)?
Tip: During the testing phase, have your metrologist perform a metrology test to ensure compatibility with your lab’s protocol.
Installation and After-Sales Service for the Gravimetric Diluter
Installation and Training
A diluter is not typically a plug-and-play instrument. Don’t hesitate to ask the supplier how the installation process works, and especially inquire about training on its usage and program creation.
Suppliers are usually very knowledgeable about their equipment, and by spending time in your lab and understanding the programs you need, they can provide valuable advice on optimizing the use of your dilutor.
Tip: Request detailed information about the installation and training process, including the number of people trained, the duration of the training, and the topics covered.
After-Sales Service and Maintenance
All manufacturers offer various levels of maintenance contracts.
What do these contracts include (replacement of worn parts, travel, labor, etc.)?
In case of a breakdown, the lab could be paralyzed. What is the intervention time promised by the supplier?
Can they provide a loaner device in case of an emergency?
Tip: Carefully review the terms of the maintenance contract to ensure it meets your lab’s needs, especially regarding response times and support during critical failures.
Purchasing from a Distributor
If you buy your diluter from a distributor, be sure to clarify who is responsible for the warranty and technical support.
Who handles maintenance, repairs, and replacement parts—the distributor or the manufacturer? This is important to ensure smooth communication and timely service if any issues arise.
Tip: Always verify the terms of support and warranty when buying from a distributor to avoid confusion down the line.
Connecting with Other Users
As we’ve seen, choosing a gravimetric diluter is a significant decision for a microbiology lab, and nothing should be left to chance.
Before making a decision, take the time to define your needs (this article should help), then reach out to other users of gravimetric diluters.
Whenever possible, avoid relying solely on contacts provided by the supplier. Instead, use opportunities like trade shows, LinkedIn or reconnecting with former classmates.
Once in contact, discuss the following:
- Performance of the technology: Does it meet the specifications promised by the supplier?
- Reliability: How many breakdowns occur per year?
- Limitations of the technology: Every technology has its limits, though suppliers rarely highlight them. Knowing these helps you avoid potential issues.
- Supplier responsiveness: How quickly does the supplier react to problems?
Gathering these insights will help you make a more informed decision.
Trust in Your Supplier
One final, yet crucial factor is the trust you have in your supplier. While this may seem subjective, it’s grounded in tangible criteria, such as:
- Ease of contact: Can you easily reach the supplier by phone, or are you directed to an automated system?
- Past experience: Have you worked with this supplier before? If not, ask another lab for feedback (via LinkedIn or SuperMicrobiologistes).
- Responsiveness: Is the supplier quick to respond and provide solutions when problems arise?
For a gravimetric diluter, it’s essential that the supplier allows you to test the device in your lab for at least two weeks to ensure it meets your needs.
Do you use a gravimetric diluter? Share your experience with us!


Trackbacks & Pingbacks
[…] we highlighted in our article : How to choose a gravimetric Dilutor, if there’s one piece of equipment you can’t afford to get wrong in a food microbiology […]
Leave a Reply
Want to join the discussion?Feel free to contribute!