Microbiology : The 4 best solutions to simplify serial dilutions
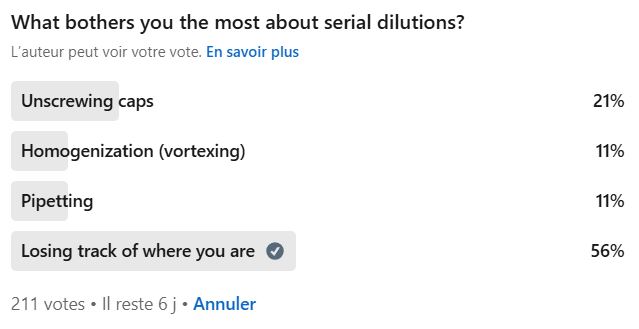
When microbiologists are asked what the most annoying task is, almost everyone answers: “Serial dilutions.”
On one hand, it’s repetitive and hard on the joints (risk of MSDs).
On the other hand, it requires a lot of focus and precision—lose track (or the tube), and you might end up with inaccurate results.
Not easy… here’s the proof:

During our visits to microbiology labs, we’ve come across methods that help standardize, simplify, or even eliminate serial dilutions altogether.
We invite you to explore them in this article.
Content :
What is a serial dilution?
In microbiology, it’s important to know that colonies on a Petri dish can’t be counted if there are too many. Generally, the limit is set at 250–300 colonies maximum.

Photo credit : STL biotechnologies St Germain en Laye
When a product contains a lot of microorganisms, serial dilutions are necessary to count them accurately. For this, glass tubes are often used.

Typically, dilutions are made by adding 1 ml of the sample to 9 ml of diluent (a 1/10 dilution) or 0.1 ml to 9.9 ml (a 1/100 dilution).
From each tube, a sample is then taken and plated onto a Petri dish, either by pour plating (1 ml) or surface plating (0.1 ml).
For each dilution, the steps are as follows:
- Open tube A.
- Take 1 ml of the sample.
- Close tube A.
- Open tube B (while holding the pipette).
- Transfer the liquid from tube A into tube B.
- Close tube B.
- Vortex tube B for 10–15 seconds—the longer, the better!
- Open tube B, take 1 ml, and repeat the process for tube C, and so on.

Serial dilutions: What’s the problem?

Here are the main issues we’ve identified (with the help of the SuperMicrobiologists):
- Poor homogenization
Tubes must be properly mixed using a vortex to ensure microorganisms are evenly distributed.
The problem? There are as many ways to use a vortex as there are microbiologists. (According to ISO 6887-1, the recommended mixing time is 5 to 10 seconds). - Pipetting precision
Precision is essential when sampling 1 mL or 0.1 mL to avoid dilution errors. - Tube confusion / Loosing track of where you are
It’s important not to confuse the tubes when sampling and dispensing.
The challenge? Staying focused on a repetitive task is not as easy as it sounds. - Unscrewing caps
Using glass tubes means opening and closing hundreds of caps every day.
The result? Repetitive movements increase the risk of MSDs (Musculoskeletal Disorders).
Let’s now look at some practical solutions to make serial dilutions a bit more… manageable.
1 – The Spiral Plater

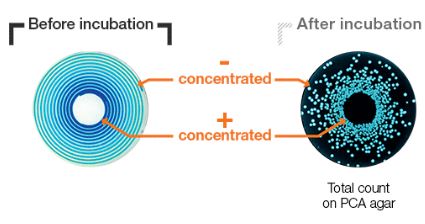
The spiral plater is an automatic plating technique that allows the equivalent of 4 logs (3 dilutions) to be spread on a single Petri dish.

Automatic platers: How does it work?
All spiral platers use the same technique. A drop of the “mother” solution is deposited in the center of the Petri dish, then spread across the entire surface. This process dilutes the solution through exhaustion.
The plating follows a logarithm decreasing curve from the center of the dish to its edges. As the solution is spread, it becomes progressively more diluted.
It’s a bit like dipping your finger in a drop of coffee and dragging it across a surface to create a line. The end of the line is less colored than the beginning.
And how about reading the results?
Counting can be done manually (well, with your eyes), but it’s much easier and faster with an automatic colony counter.
Key advantages of Interscience’s spiral plater:
- Fewer dilutions: With just one Petri dish, you can cover 3 dilutions, providing a counting range from 100 to 1 x 10⁷ CFU/mL.
- Fully automated device: This means fewer risks of errors.
- Standardized spreading: (check out this article about the “deadly impact” of spreading with a hockey stick!).

Cherry on the cake: The easySpiral Dilute version allows for the automation of 5 serial dilutions (1/10) before proceeding with spiral plating. It can handle up to 10¹² CFU/mL.
2 – The Serial Diluter: Inlabtec’s Serial Dilution System

The Inlabtec Serial Diluter transforms traditional serial dilution workflows, streamlining the process to an unparalleled degree while minimizing environmental impact.
How does the Serial Diluter work?
- Traditional tubes are replaced with by resource-optimized bags that use the lowest possible amount of plastic.
- As shown in the video, the operator simply transfers liquid from one bag to the next.
- Adding the diluent and homogenizing the mixture are fully automated.
Pretty handy, isn’t it?
Key advantages of the Inlabtec Serial Diluter:
- Automatic homogenization:
No need for a vortex! The Serial Diluter guarantees perfectly mixed, reproducible dilutions every time. - Improved ergonomics:
Say goodbye to tubes, caps, and repetitive opening/closing motions. Simply add the sample into the bag to reduce the risk of musculoskeletal disorders (MSDs). - Error-proofing (almost!):
A light clearly indicates which bag to use next, guiding the operator step by step, ensuring accuracy with minimal effort. - Eco-conscious design:
Lightweight, thin-walled bags significantly reduce material usage, waste, and the ecological footprint compared to traditional methods or alternative dilution systems
3 – The Dilucup System by LabRobot

This technology keeps the exact same principle as traditional serial dilutions while eliminating critical steps.
How does the Dilucup system work?
Here, tubes are replaced by Dilucups, small pre-filled cups containing your diluent. The key advantage of those Dilucups is their ability to be shaken at high speeds (410–660 rpm) while remaining open.
During dilution, the shaker uses a color-coded LED to indicate which cup to draw liquid from and which cup to transfer it to… greatly reducing the risk of errors.
Between dilutions, a simple hand wave in front of a sensor activates the vortex, ensuring automatic and standardized homogenization.
Key advantages of the Dilucup system:
- No need to open or close tubes:
Say goodbye to repetitive cap handling… and to RSI (Repetitive Strain Injuries). - Automatic, standardized vortex mixing:
The vortex integrated into the platform homogenizes the Dilucups automatically between each transfer… no manual effort required. - Visual guidance with LED indicators:
Ever lost track of where you are during a serial dilution? (We’ve all been there!) With this system, LEDs guide you step by step, reducing the risk of mistakes. - Ready-to-use diluent in Dilucups:
No need to prepare the diluent. Dilucups come pre-filled with sterile diluent and a certificate of analysis. The precision range of 9 mL ± 1% is especially useful for laboratories working with probiotics.
4 – Easy-open tubes
This solution may not completely revolutionize serial dilution… or maybe it will!
As we mentioned in the section “Serial dilutions: What’s the problem?”, a big part of the process involves opening and closing tube caps.
The main issues with classic tubes:
- They are often very hard to open.
- You have to turn them several times to open and close them.
- When you repeat this process hundreds of times a day, it creates the perfect conditions for developing musculoskeletal disorders (MSDs).
The solution? Use tubes with an easier opening system — or at least an opening system that requires less effort.
More and more manufacturers are offering this type of tube, either with plastic caps (easier to unscrew) or with shorter screw threads.
This solution won’t eliminate all the challenges of serial dilution, but it does offer greater comfort at a lower cost.
Be careful! Make sure your new tubes don’t leak, as this is a potential risk with certain designs.
We hope this article helps you find the best solution for your lab to make the serial dilution process easier.
If you know of other ways to simplify serial dilutions, feel free to share them with us in the comments!


Leave a Reply
Want to join the discussion?Feel free to contribute!